
Entering the Monolith: how to swap tokens in your wallet
One of the most groundbreaking features of decentralised finance is the ability to swap between different crypto assets in a permissionless manner. Thanks to the power of smart contracts, any DeFi user can visit an automated market maker protocol, connect their wallet, and access liquidity pools to swap between tokens. In this guide, we’ll explain how to swap tokens in your Monolith wallet.
Please note this article applies to the newest versions of the Monolith wallet, released after April 2021. If you have an older version of the app, you can also access our Paraswap integration to swap tokens in your contract wallet. If you use our integration to swap tokens, you will receive the swaps to your Main wallet.
1. Add ETH to your wallet
As every transaction on the Ethereum network requires gas, you must have some ETH in your wallet. You can buy ETH through the app with your Visa or Mastercard, or send ETH from another wallet.
2. Install MetaMask
Download the MetaMask browser on your desktop. Make sure that you have the correct link — scammers often carry out phishing attacks by posing as established crypto enterprises. MetaMask is compatible with Chrome, Chromium and Brave.
3. Import your Seed
Open MetaMask in your browser and select ‘Get Started’ followed by ‘Import Wallet’. Your Monolith Seed can be found in-app by selecting the ‘Settings’ tab followed by ‘Back up Seed’ under the ‘General’ menu. The words must be typed in the exact same order. You’ll also need to enter a new password.
If you already have another MetaMask wallet, you may need to use it on a separate browser. It’s supported in Brave, Chrome and Chromium.
Important note: we generally recommend storing your Seed offline in a safe place. Avoid keeping it online where possible, as it could be compromised.

4. Select “Swap” and choose your assets
Hit the blue “Swap” tab to swap assets directly through MetaMask. Select the asset to swap from in your Monolith wallet and the token you’d like to receive. MetaMask supports most leading ERC-20 tokens — you can search for your token using the ticker symbol or by pasting the contract address listed on Etherscan.

5. Unlock assets (for first time swaps)
If you’ve never swapped the asset in your wallet before, you may need to ‘unlock’ it to give the smart contract permission to move it. This process counts as a transaction, so there will be a gas cost to approve it. If you’ve previously swapped the asset on MetaMask, you can skip this step.
6. Review Swap
Choose your slippage (we recommend 2%) and select “Review Swap”. MetaMask works to find the best rate across different decentralised exchange protocols and delivers a quote. The quote also includes a service fee of 0.875%.
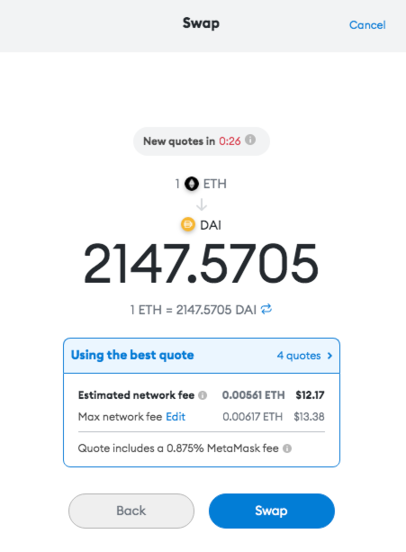
7. Swap
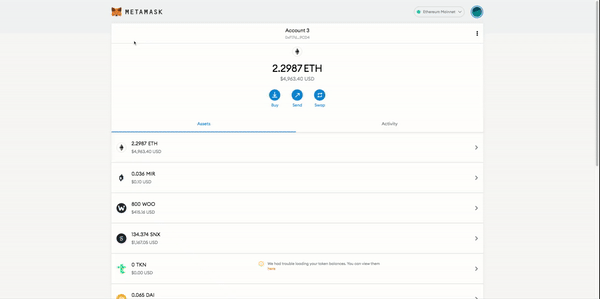
You have a time window to confirm the quote. The screen will show you a breakdown of the network fees and MetaMask fee. Select “Swap” to confirm. Once confirmed, the assets will show in your Monolith wallet.
View the process below (note ETH was already unlocked before this transaction was processed, and the transaction must also be confirmed as the final step):
8. Disconnect your wallet
Once the transaction is confirmed, it’s a good idea to sign out of MetaMask for security purposes. To sign out, select the circle in the top right hand corner, followed by “Lock”.
Swapping tokens via a decentralised exchange (intermediate)
You can also swap tokens by using a decentralised exchange rather than MetaMask’s swap feature. To use this method, complete the first three steps above to connect to MetaMask, then follow the steps below
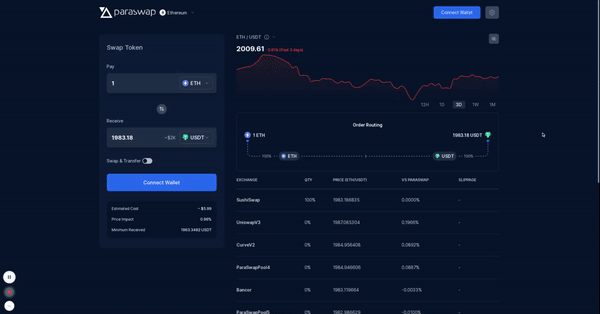
1. Visit an automated market maker
Head to a decentralised exchange or an aggregator protocol to make a swap. Monolith recommends Paraswap, but other popular options include Uniswap, SushiSwap, and 1inch. As with downloading MetaMask, make sure that you have the correct link to avoid any phishing attacks.
2. Connect Wallet
Select the ‘Connect Wallet’ button in the top right hand corner followed by the MetaMask logo.
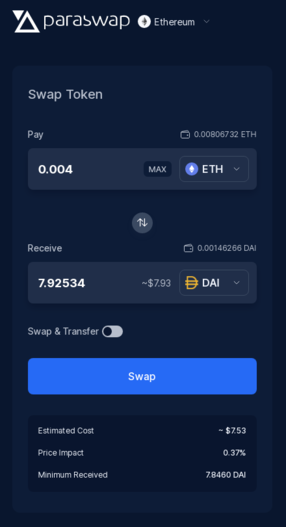
3. Select the assets you want to swap
Select the asset you want to swap in your Monolith wallet, and the asset you want to receive.
If you’re using Paraswap, make sure the ‘Ethereum’ network is selected (not ‘Polygon’ or ‘BSC’). If you’re using another platform like Uniswap or SushiSwap, make sure ‘Swap’ is selected (not ‘Pool’, ‘Vote’, or any other kind of activity).
4. Unlock assets (for first time swaps)
If you’ve never previously swapped the asset using the protocol, you will need to ‘unlock’ it to give the smart contract permission to move it. This process counts as a transaction, so there will be a gas cost to approve in a separate MetaMask window. If you’ve previously swapped the asset on Paraswap, you can skip this step.
4. Swap
Once the asset is unlocked, you can make your swap. There will also be a gas cost to approve in MetaMask. The asset you’re receiving will appear in your wallet once the transaction is processed.
View the process below (note ETH was already unlocked before this transaction was processed, and the transaction must also be approved in a separate MetaMask window):
5. Disconnect your wallet
Once the transaction is confirmed, it’s a good idea to sign out of MetaMask for security purposes. To sign out, select the circle in the top right hand corner, followed by “Lock”.
That’s the whole process. The balances of each token then show up on your home screen, with your total balance listed at the top as usual. Swapping tokens is easy, and the best part is that it’s only the beginning of what will be possible in this new trustless world.
Sign up to Monolith here.

